| 일 | 월 | 화 | 수 | 목 | 금 | 토 |
|---|---|---|---|---|---|---|
| 1 | 2 | 3 | 4 | 5 | ||
| 6 | 7 | 8 | 9 | 10 | 11 | 12 |
| 13 | 14 | 15 | 16 | 17 | 18 | 19 |
| 20 | 21 | 22 | 23 | 24 | 25 | 26 |
| 27 | 28 | 29 | 30 | 31 |
- MongoDB
- docker
- network
- AWS
- docker network
- 토스카드
- codecommit
- clone
- 앱테크
- Container
- 커피머니불리기
- VPC
- aws codecommit
- mininet
- 하나머니
- 재테크
- namespace
- Python
- DocumentDB
- MongoEngine
- S3
- 리워드앱
- 리뷰
- 후기
- python3
- 포인트앱
- 도커
- Linux
- built-in
- 실사용
- Today
- Total
ㅍㅍㅋㄷ
Mininet을 이용한 SDN실습 (2) - Python을 이용한 Topology 구성 본문
Python을 이용한 Mininet Topology 구성
[Contents]
1. Mininet을 통한 SDN실습 - Virtual Box와 Vagrant를 이용한 구성
2. Mininet을 이용한 SDN실습(1) - topo, switch, controller
3. Mininet을 이용한 SDN실습(2) - Python을 이용한 Topology 구성
지난 포스팅에서는 Mininet의 기본 구성인 topo 와 switch, controller 에 대해서 알아봤다. 보통 의 경우 Mininet 에서 제공하는 mn 명령어를 통해 손쉽게 Topology 구성이 가능했다.
: Mininet을 이용한 SDN 실습(1) - topo, switch, controller
하지만, 기본 제공되는 Single, Tree, Linear 같은 형태가 아닌 Custom 한 형태의 네트워크 구성을 테스트 하고 싶다면 어떻게 해야할까? Mininet의 경우는 Python API를 지원하기 때문에 Python 을 이용해 내가 원하는 네트워크 구성을 직접 구성이 가능하다.
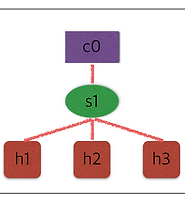
예를 들어 아래와 같은 topology를 구성한다고 해보자.

이 구성은 사실 mn 명령으로도 손쉽게 구성이 가능하다.
root@~~# sudo mn --topo single,3
*** Creating network
*** Adding controller
*** Adding hosts:
h1 h2 h3
*** Adding switches:
s1
*** Adding links:
(h1, s1) (h2, s1) (h3, s1)
*** Configuring hosts
h1 h2 h3
*** Starting controller
*** Starting 1 switches
s1
*** Starting CLI:
mininet>
하지만 CLI 를 사용하지 않고 python 으로도 직접 구현이 가능하다.
아래는 python 으로 작성한 single 네트워크 topology 구성이다.
k 값에 따라 host의 개수 조정이 가능하다.
#!/usr/bin/python
from mininet.topo import Topo
from mininet.net import Mininet
from mininet.util import irange,dumpNodeConnections
from mininet.log import setLogLevel
class SingleTopo(Topo):
def __init__(self, k=1, **opts):
super(SingleTopo, self).__init__(**opts)
switch = self.addSwitch('s1')
for i in range(1,k+1):
host = self.addHost('h%s' % i)
self.addLink(host, switch)
def run(self):
net = Mininet(self)
net.start()
dumpNodeConnections(net.hosts)
dumpNodeConnections(net.switches)
net.pingAll()
net.stop()
if __name__ == '__main__':
setLogLevel('info')
single = SingleTopo(k=3)
single.run()
- SingleTopo 라는 Class 를 정의하고 Topo 클래스 상속
- addSwitch() : 스위치 생성
- addHost() : 호스트 생성
- addLink() : 호스트 또는 스위치 간 링크 생성
- dumpNodeConnections() : 스위치 또는 호스트의 연결 정보 확인
- pingAll() : 모든 호스트간 ping 테스트
이렇게 작성한 python 을 실행하면 network 토폴로지가 구성되며 ping test를 수행하고 종료된다.
root@~~# python singleDemo.py
*** Creating network
*** Adding controller
*** Adding hosts:
h1 h2 h3
*** Adding switches:
s1
*** Adding links:
(h1, s1) (h2, s1) (h3, s1)
*** Configuring hosts
h1 h2 h3
*** Starting controller
*** Starting 1 switches
s1
h1 h1-eth0:s1-eth1
h2 h2-eth0:s1-eth2
h3 h3-eth0:s1-eth3
s1 lo: s1-eth1:h1-eth0 s1-eth2:h2-eth0 s1-eth3:h3-eth0
*** Ping: testing ping reachability
h1 -> h2 h3
h2 -> h1 h3
h3 -> h1 h2
*** Results: 0% dropped (6/6 received)
*** Stopping 1 switches
s1 ...
*** Stopping 3 hosts
h1 h2 h3
*** Stopping 1 controllers
c0
*** Done
추가로 linear 구성도 python 으로 작성해 보면 아래와 같이 구현이 가능하겠다.
host와 switch의 구성 수는 k 값에 설정하는대로 증가 되도록 했다.
class LinearTopo(Topo):
def __init__(self, k=1, **opts):
super(LinearTopo, self).__init__(**opts)
lastSwitch = None
for i in range(1,k+1):
host = self.addHost('h%s' % i)
switch = self.addSwitch('s%s' % i)
self.addLink(host, switch)
if lastSwitch:
self.addLink(switch, lastSwitch)
lastSwitch = switch
def run(self):
net = Mininet(self)
net.start()
dumpNodeConnections(net.hosts)
dumpNodeConnections(net.switches)
net.pingAll()
net.stop()
그림으로 그려보면 아래와 같은 구성이 되겠다.

하지만, 위와 같이 python 파일을 직접 실행하면 mn 명령어를 이용해서 구성한 것과 다른 점이 있다. 작성된 명령만 수행하고 바로 종료되어 버린다는 점이다.
만약 직접 작성한 python 구성 파일로 network를 구성후 CLI 로 원하는 테스트를 수행하고 싶을 수 있다.
그럴때는 두가지 방법이 있다.
첫번째로, mininet.cli 를 import 하고 호출한 후 실행하면 된다.
#!/usr/bin/python
from mininet.topo import Topo
from mininet.net import Mininet
from mininet.util import irange,dumpNodeConnections
from mininet.log import setLogLevel
from mininet.cli import CLI
class SingleTopo(Topo):
def __init__(self, k=1, **opts):
super(SingleTopo, self).__init__(**opts)
switch = self.addSwitch('s1')
for i in range(1,k+1):
host = self.addHost('h%s' % i)
self.addLink(host, switch)
def run(self):
net = Mininet(self)
net.start()
dumpNodeConnections(net.hosts)
dumpNodeConnections(net.switches)
CLI(net)
net.stop()
if __name__ == '__main__':
setLogLevel('info')
single = SingleTopo(k=3)
single.run()
cli를 추가한 후 파일을 실행하면 아래와 같이 mininet CLI 로 invoke 된다.
root@~~# python singleDemo.py
*** Creating network
*** Adding controller
*** Adding hosts:
h1 h2 h3
*** Adding switches:
s1
*** Adding links:
(h1, s1) (h2, s1) (h3, s1)
*** Configuring hosts
h1 h2 h3
*** Starting controller
*** Starting 1 switches
s1
h1 h1-eth0:s1-eth1
h2 h2-eth0:s1-eth2
h3 h3-eth0:s1-eth3
s1 lo: s1-eth1:h1-eth0 s1-eth2:h2-eth0 s1-eth3:h3-eth0
*** Starting CLI:
mininet>
mininet> quit
*** Stopping 1 switches
s1 ...
*** Stopping 3 hosts
h1 h2 h3
*** Stopping 1 controllers
c0
*** Done
root@~~#
mininet CLI를 종료하는 방법은 위와 같이 간단히 quit 명령으로 가능하다.
다른 방법은, mn 명령어에 custom 옵션을 이용해 작성한 python 파일을 불러와 topology를 구성하는 방법이다.
먼저 위에서 작성한 single 구성 class를 약간 수정하자.
#!/usr/bin/python
from mininet.topo import Topo
from mininet.net import Mininet
from mininet.util import irange,dumpNodeConnections
from mininet.log import setLogLevel
class SingleTopo(Topo):
def __init__(self, k=1, **opts):
super(SingleTopo, self).__init__(**opts)
switch = self.addSwitch('s1')
for i in range(1,k+1):
host = self.addHost('h%s' % i)
self.addLink(host, switch)
def run(self):
net = Mininet(self)
net.start()
topos = { 'mytopo': ( lambda x: SingleTopo(k=x) ) }
- if __name__ == '__main__': 구문을 삭제한다.
- net.stop() 호출 부분을 삭제.
- lambda 함수를 이용해 class를 호출하도록 하고, mytopo 의 value 로 설정하도록 수정한다.
*** Creating network
*** Adding controller
*** Adding hosts:
h1 h2 h3 h4 h5 h6 h7 h8 h9 h10
*** Adding switches:
s1
*** Adding links:
(h1, s1) (h2, s1) (h3, s1) (h4, s1) (h5, s1) (h6, s1) (h7, s1) (h8, s1) (h9, s1) (h10, s1)
*** Configuring hosts
h1 h2 h3 h4 h5 h6 h7 h8 h9 h10
*** Starting controller
*** Starting 1 switches
s1
*** Starting CLI:
mininet>
mininet CLI로 invoke 되었다. 이제 내가 구성한 network 환경에 CLI로 테스트가 가능하겠다.
아래는 mininet CLI를 이용해 h1 호스트에서 h10로 ping 테스트 이다.
mininet> h1 ping h10
PING 10.0.0.10 (10.0.0.10) 56(84) bytes of data.
64 bytes from 10.0.0.10: icmp_seq=1 ttl=64 time=1.83 ms
64 bytes from 10.0.0.10: icmp_seq=2 ttl=64 time=0.200 ms
64 bytes from 10.0.0.10: icmp_seq=3 ttl=64 time=0.042 ms
....
h1 과 h2 간 bandwidth 테스팅도 간단히 CLI로 가능하다.
mininet> iperf h1 h2
*** Iperf: testing TCP bandwidth between h1 and h2
*** Results: ['30.3 Gbits/sec', '30.4 Gbits/sec']
아래는 python API 레퍼런스이니 참고해서 개발하면 된다.
[참고]
- http://mininet.org/api/annotated.html
- http://mininet.org/walkthrough/#custom-topologies
'IT > SDN' 카테고리의 다른 글
| Mininet을 이용한 SDN 실습(1) - topo, switch, controller (1) | 2015.07.17 |
|---|---|
| Mininet을 통한 SDN실습 - Virtual Box와 Vagrant를 이용한 구성 (0) | 2015.06.23 |